Thursday, February 28, 2008

Buttermilk-Rava Dosa - A Quick One!


Back to my ol' love dosas! This one is from a colleague from ex-Mumbai office. She is a gujarati girl and this is her mom's recipe. I love these dosas for their flavour- buttermilk n rava combo!

Ingredients :
1 1/2 cups fine rava(Semolina)
2 tbspn maida (all purpose flour)
1 cup labaan (i.e buttermilk)
1 medium onion
1 inch ginger
2 green chillies
3-4 stalks of fresh coriander leaves
Salt
1 tsp sugar / grated jaggery
Pinch of Hing (Asafoetida)
Water

Method :
In a big bowl, combine rava, maida, salt,sugar, hing with buttermilk, whisk till its lump free.(Keeping this aside gets standing time for the batter.) In a food processor, pulse the onions, ginger, chillies and coriander leaves till finely done or fine chop with a knife. Add to the batter. Add water to get dosa batter consistency, if required. Leave for ten minutes covered.
Heat the dosa griddle, pour and spread one ladle full, cook on both sides till done.

Serve with chutney of your choice!


A glass of chai , kaapi or health drink goes well with this breakfast, mine goes with a glass of plain hot milk!!!

Wednesday, February 27, 2008

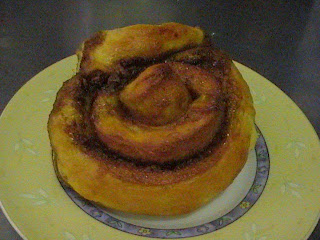
Cinnamon Rolls


I had tasted these lovely buns with fresh cinnamon flavour when I was new to Kuwait!
I absolutely loved these yummy tasteful and mildly sweet bread!

I was googling on 'How to' on baking when I came across this beautiful video on making cinnamon rolls...I just could not ignore it! The link is here. I followed the recipe as is.

URL - below.
http://www.videojug.com/film/how-to-make-cinnamon-rolls

After reading and re-reading the directions, yesterday I finally made these yummy rolls!
The link explains better on how to go about and for a first timer like me, these turned out great!
They can be eaten hot out of oven or frozen too. I gobbled 3 of these huge rolls the moment they were out of oven! They tasted heavenly!

If you love cinnamon in any form, then this is a must try recipe!!

The bread part was moist and fluffy, the sides and crust crispy and the top part was crunchy due to the egg wash and the bottom of roll had mild sweet flavour as bit of sugar cinnamon paste settled around making it heavenly in each bite!!

Notes : (These are for my reference next time!)

* 500 gms maida works fine.

* Once the dough has risen, punch it back to a ball only when ready to roll out else it starts rising again. Punch out all the air from the dough to make it roll well!

* Made the egg wash minus flour, with one egg and two tbspn of milk beaten well. It gives a nice crunch to the top part of the roll.

* Bake time - my oven - 190C @ 18 mins/ 12 pcs.


Yum yum cinnamon rolls for breakfast with a cup of hot coffee, very filling!!!

Awards Night!!!! (Thankyou dear friends!) Part - II


Sandhya passed me this lovely flattering award, but I guess my blog is still far from the word 'E'!
I thank you , Sandhya for being kind and passing me this one! Blog-booster I can say!


I am passing it on to some lovely bloggers I rate in 'E'


Shilpa of Aayis Recipes and Asha of Foodies Hope are leagues ahead E+++++!!! Once I create that award I shall pass it on to you both!!

Meera (Enjoy Indian Food) you truly have exccccelled dear! 2 posts a day, traditional, authentic, from regions in and around India, I feel proud to have comeacross your blog (I trust you to forget 'the scolding' it was said with lots of affection for you!! You put me in AWE!

Maya (All About Konkan) Authentic Konkan dishes, enthu baker-like me!! Deserves an E for excellent way of cooking and posting lovely dishes!


Sia (Monsoon Spice) Lovely website with lots on cooking and also she shares technical aspects of many a things including blogs which has turned out x-tremely helpful to bloggers like me!

Indo Sun God (Daily Musings) Traditional dishes, her own innovation with greens, legumes and grains makes her excel in her style of cooking ...

Seema (My Randap-Everyday cooking) Has a lovely blog, authentic recipes, I have tried few so far!! You are excelleent in my view!


Zlamushka ( Burnt Mouth) (An E++ blog with lot of healthy recipes innovatively dished out! Thanks Zla!)


Yet another humble bow for this award, and passing on to these lovely bloggers who have been nice and excelled in their own rights!!
Thanks for your support and boosting blog morale!!

Sunday, February 24, 2008

Awards Night!!!! (Thankyou dear friends!)


“Nice Matters Award is for those bloggers who are nice people; good blog friends and those who inspire good feelings and inspiration. Also for those who are a positive influence on our blogging world.”


Thanks dearest Meera, Pravs for considering me to passing on this lovely looking Pinky award!
I was passed this award, very first, by cute Pravs of Simply Spicy on 19th Feb, and by my dear dear Meera of Enjoy Indian Food - 2 posts a day wonder on 22nd Feb!!

I accept this with warm thanks to both of you lovely authentic bloggers and wish to pass it to those who influence me a lot here, irrespective of whether they hold other awards or not, whether they are new bloggers or old!!! Meera n Maya have been ruled out as they recently got it, very much deserving here!!

Asha of Foodies Hope too inspires me with her huge spreads n God alone knows how she squeezes in all of that time to cook, read, blog, etc ....wd surely love to take some time managment classes!! :D

Deeba, I nominated you, but again am late !! :D

Shilpa (Aayis Recipes )

Spicyana (Archana)

Manisha (Indian Food Rocks)

Zlamushka ( Burnt Mouth)

Sandhya (Sandhyas Kitchen)


Dear friends, its no compulsion to take up and pass, but a nice way to let you all know that you all inspire me a lot in many fields of life, be it cooking or others hence wish to pass you this 'Nice Matters' Awards also would like you lovely bloggers to continue your way of blogging!!!


THANK YOU VERY MUCH!!


Thursday, February 21, 2008

Stained Glass Cookies-Yippppppeeeee!


Stained Glass name is obtained since the basic butter-sugar cookies are baked with little crushed hard-candy which spreads beautifully and gives a stained glass effect on cooling!

So its Deeba again! First time saw these cookies at her space-HERE! Awesome! I thank her with all my heart for being choooo chweeet to share her stuff (12 yrs of solid experience she has in baking!)

I also googled around a bit for recieving some help in my novicius attempt and it was truly an art accomplished post baking these, a feeling of content and some sort of therapy to my daily life!!
I got 33 cookies, big n small, from 2/3rd of the measure, all got over in a span of 3 days!!!!!

The other site I googled is goodhousekeeping.com, the cookie is HERE, they had the same moulds that I had on me, hence I opted to go for this design and a few tips.

The recipe is from Deeba's and the few tips I used from GHK shall write gradually by the end of this post.


Ingredients :
3/4 cup butter (at room temp)
1 cup fine / castor sugar
2 1/2 cups maida (all purpose flour)
1 egg beaten
1 pinch salt
1 tsp vanilla essence
Hard candy - various colors crushed

Method :
::
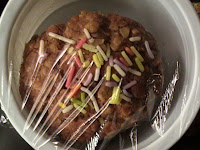
In a big bowl, beat butter n sugar until fluffy, add vanilla, salt, beat for half a minute. Mix in the beaten egg and add all the flour, combine and gather to make a dough. Refrigerate for 30 minutes in a cling wrap. (Chill in three parts disc shaped for convinient rolling)
:: Pre-heat the oven to 170 C or 350F. Line a cookie sheet with foil. Keep the cookies ready on another foil as well.


:: Crush the candies and keep aside.


:: Take one disc from the fridge, roll out to 1/4th inch thickness, cut with the 3 inch cookie-cutter and place on the foil. Take a smaller cookie cutter 1 1/2 " and cut out the center, place the trimmings or cutouts in the fridge. Fill with half tsp of your choice of candy colour. (I did the first batch in this manner, later batches, I added the crushed candies post 7 mins baking and placed them back for additional 4 mins)


:: Bake for 11 mins @ 170 C or till the edges are golden brown, the crushed candies will bubble and spread neatly. Once time is up, take out from oven, after a minute, take the foil with baked cookies and place to cool on a dry surface or wire rack. In 3-4 minutes, the cookies will come off clean! Like shown aside.

Yeah I got a bit creative n tried twin colors, n succeeded too!! :D


**The other batches were baked @ 160 C as my oven got very hot. I also baked the cookies for 7 minutes, took them out, placed the 1/2 tsp crushed candy and placed back for another 4 mins. The reason being the candy part was turning out slight bitter due to longer baking, hence reducing candy bake time enhanced the flavour.


Nope these r n't stained glass!! The center cut out, I baked along, with a bit of sprinkles!! Howzaaattttt??


There were few more cookies which I treated the same as above....so varieties were available!!


The last batch, I used Mansi Desai's Idea-HERE. Have yet to try out her complete recipe..these were colorful n over in minutes!!!


Creative kicks I think!!


Store them in tight airtight jar!


Still contemplating!!! Don't...don ur apron n bake these..earn name, fame and see them all gone without vain!!!

Tuesday, February 19, 2008

Za'atar with Sesame Brown Bread And Milked Soya


Za'atar is defined aptly here!

The zaatar that I have used here is green coloured --which in short wiki defines as -
"Green za'atar mixture is traditionally composed of dried thyme (Thymus vulgaris), toasted white sesame seeds, and salt. Some sources also include savory, hyssop, oregano, cumin, and fennel seed. "

I came across this mid-eastern savoury item when I first came here. My hubby and friends described it as mid-eastern chutney or more like the chutney podi with idli(Dry chutney soaked in oil as idli dip). :) That was quite some comparison! There are various varieties of which this green zaatar is what we get in Kuwait.


There is notably no recipe, I had picked up Brown sesame-round flat bread and spread the zaatar mixed with extra virgin olive oil, enough to make it spreadable. It makes for a filling and light breakfast!


The addition I made was to prepare soya milk Zlamushka's way, she suggested me to soak, boil, coarse-grind the soya in that order prior to milking. The sediment available after squeezing the ground soya, called 'Okara' when added to chappati flour, gives out the best softest chapatis!!
The milk when boiled gives malai called 'Yuba' which again can be used for a recipe!! In all soya bean is not only adding health to our body, but also none of the process is wasted! All in all I now call it 'Kalpavruksha'!!! (pic-raw soy beans, the soy milk filtered, Okara)


The milk bottled and refrigerated for use. This soy milk so obtained can be made flavourful by mixing vanilla and sugar for vanilla flavour or cocoa powder and sugar for chocolate flavour. The brand Godrej in India has mango, apple, cashew-almond and many more flavours to the tetra-packed soya.

My daughter can now have homemade!!! Yaaayyyyy!

Friday, February 15, 2008

Hearty Affairs!


TINYYYYY CUPID


HAPPPYYYYYYY VALENTINES' DAYYYYYYYYYYYY!!!!!!!!!


Sunny EGG

Here is a hearty Simple Egg Cake baked as 'Heart' Recipe from Aayi's Recipes!


May GOD bless all of us with abundance of love in our hearts towards fellow beings!


Enjoy a heartful, eat to your heart's content!


Wednesday, February 6, 2008

Tutti-Fruitti Icebox Cookies & A Cream Creme Custard


Pushpa - Thanks for posting these lovely 'ICE BOX COOKIES'! Its been few months since I have been craving to bake these but never got around due to time , better late than never!
I got 38 lovely cookies, the most devoured ones, kids loved them and hubby was eating them away by dozens, of course, I snatched away half-dozen :D They got over within 2 days time, between just four of us!! KEEPER COOKIES!!

These are called icebox as the dough can be stored by way of freezing in a refrigerator for upto 3 days and can be cut and baked directly from the freezer!

Pushpa also mentions " We could use any dried fruits for this cookie. I have used a combo of dried cranberries, raisins, candied pineapples, dried apricot and glazed cherries in this cookie. I have also used desiccated coconut as a main ingredient to create a light and crispy texture." Link here for Pushpa's cookies.

Thankyou Pushpa!


Ingredients

1 cup maida
1 tsp baking powder
1/4 tsp salt
1/2 cup butter (softened)
1/2 cup granulated sugar
1 egg
1 cup dessicated coconut
1 cup tutti-fruitti

Method :
Put the maida, baking powder and salt through a sieve and set aside.
Beat the butter and sugar until fluffy, add egg, beat well. Combine the flour, dessicated coconut and tutti-fruitti. Make a dough.


Divide into two portions. Shape into cylindrical roll and wrap in cling film , chill for minimum 4 hours or overnight.


Slice through the dough log with a serrated knife, slices should be thin. Place them on a cookie sheet lined with parchment with enough space.

Bake at 175 deg C for 10 mins or until golden, they will look mushy in the centre, but harden on cooling. Allow to cool for ten minutes and store in an airtight jar!


I got an yield of 38 cookies from the above measure.

These marvellous cookies are ready to be devoured, bet you can't stop at one!!!


My craving for sweet speaks volumes through my posts! They outnumber the meals!!
On one such whim to have a dessert (Deeba, this happened shortly after reading your Panna Cotta-Strawberry Coulis post, I must admit!). I made the really simple custard with a ready caramel base, only had to add milk and stir for home-made satisfaction!!!


Have a scoop of this ROYAL- Crema Creme!!!

Tuesday, February 5, 2008

Eggless, Butter-Free Oats & Cocoa Cookies!


Taste of India, a forum started by Sailu of Sailu's Kitchen, has been going strong with Foodie Bloggers! Thanks for initiating efforts towards aggregating Food Bloggers!!

The array of cookies titled as Christmas Delights posted by her had me hooked on, as they were 'Eggless' and particularly these 'Oats Cookies' which were not only high on fibre but were butter-free!! This appealed to the mother in me, more than the cook in me as my daughter is eczematous/ allergic to milk and milk products. These cookies tasted good, she loved them along with all those who tasted it too!

I shall be making these more often! I added sprinkles so that it appealed to the tiny eyes!!


Ingredients:

1 1/4 cup cooking oats
1/2 cup oil (used sunflower)
1/2 cup maida
1 cup sugar powder
1 1/2 tbsps cocoa powder (light)
3/4 tsp baking powder
1/4 tsp baking soda
1 tsp vanilla essence

Method :

Mix maida, baking powder, baking soda and cocoa powder. Sieve it. Blend the oil and sugar well till smooth, add vanilla essence, combine the maida mix and oats and knead into a soft dough. Shape into balls of lemon size and flatten them. Line a cookie sheet with parchment, place each of these flattened balls with a bit of spacing, press some sprinkles on surface of each.

**Tip frm Sailu :In case binding these is difficult, add a tsp of milk.(I got perfect dough with her measure)

In a pre-heated oven, at 180 deg. C, bake them for 10-12 mins. They appear mushy, but once placed to cool, they harden-store in airtight jar.


Yield 20 yummy cookies!! And a bright tiny face, savouring these attentively!!


.

Monday, February 4, 2008

A 'Spidey-Web Design' Birthday Cake!


I was glad when she relented promptly to my mail on using her cake design! Deeba of Passionate Baker, has been apt for the title she blogs on, her pictures are gorgeous, marvellous choice of recipe and more so an intriguing write-up! THANKS DEEBA!! Chocolate - Strawberry is such a winning combo!!

Making cake from scratch is not my cup of tea currently! Here is the decoration I tried to replicate! I have no hands on experience in baking , filling and frosting, but my frenzy and eagerness for baking for my kid emerged greatly making me google over many aspects of baking-filling-frosting videos to obtain what is shown above. I have made it with ingredients that put me to convinience and at ease.

Ingredients :
For the Chocolate Sponge, I used a Betty Crocker's 18 ounce Milk Chocolate mix and baked as per directions on the pack a day in advance. I baked it on a 9" springform pan, when the cake cooled, I detached the rim and leveled the cake on top, turned it upside down as it is more even at the surface, for making the frosting job more easy, left it on the bottom of the pan to serve as base.
Sprinkles - To decorate the sides.
Chocolate Curls - I used one bar of Diary Milk at room temp.

Ingredients For Filling :
1 sachet of Dream Whip
1/2 cup (115 ml) pasteurised milk
2-3 drops vanilla essence
20 strawberries (5 reserved for decoration)

Method for filling :
On a high speed, beat the milk and contents of sachet on a electric mixer till stiff peaks form, add the essence. Fill 3 tbspn of this in a decoration bag with a piping nozzle, for making the pattern. Hull the berries and chop them fine. Fold the berries gently into the whipped cream at the time of actual filling.

Ingredients for Ganache :
200 ml of whipping cream
200 gms of Hershey's semi sweet chocolate chips

Method for Ganache :
In a pan heat the cream till it simmers. Take off the heat source, on counter top. Add the chocolate chips and stir in circular motion for 4-5 minutes with a spatula till the chocolate melts and mixes up well with the cream. It has to be liquid in consistency. Prepare 30 minutes ahead of assembling. Allow it to cool, as it cools it will obtain a spreadable consistency.

Ref for ganache : http://www.expertvillage.com/video-series/1313_ganache.htm

Ref for chocolate curls : http://video.about.com/candy/How-to-Make-Chocolate-Curls.htm

ASSEMBLING :

:: Cut the cake in two layers. (At this point place a large parchment paper below the plate.)
:: Fill the base layer with strawberry filling, place the top layer on it.
:: Pour the ganache on the top and spread on the surface and sides evenly by moving the base plate in tilted angle.
:: Add sprinkles on the sides with fingers, some will stick, some would fall off.


:: Pipe a spiral begining from centre moving outwards. With a wooden pick, angled at 60 degrees from the cake, drag a line first from centre to out, the next line from edge towards the centre. Continue this till the pattern is formed.
:: Along the rim, decorate with chocolate curls.
:: Finally place the strawberries for decoration. Slice few, decorate the top.
:: Refrigerate it for few hours, take out 30 mins prior to cutting.


Note : Do the strawberry decoration prior to cutting the cake for fresh look.


HAVE A BLAST AND ENJOY THIS YUM-YUM CHOCOLATI-BERRRRRRYYY CAKE!!!


.